Orbital Motion Image Gallery using JavaScript & jQuery
Orbital Motion Image Gallery using JavaScript & jQuery
About How I Create This Orbital Motion Image Gallery
Before Getting Started …
I have experienced and focused on JavaScript for about nearly half year. I learn JavaScript by creating several small projects or games on CodePen.io and I pushed my stuff on my GitHub repo. Creating animated webpage is fun and exciting. I’m currently an intern in 5xRuby inc. and this “orbital image gallery” idea was inspired by our intern’s JS course teacher, Kuro, which he taught us how to create simple image gallery (see this repo ex-084-homework.html), so I decided to make my own one with a circular motion structure.
我本身對於 JavaScript 有一些經驗以及鑽研了差不多半個月的時間了。我在 CodePen.io 上藉由創作小遊戲或小應用程式來學習 JavaScript,我也把我所創作的東西放在我的 GitHub Repo. 上。創作出動感的網頁是一件令人興奮的事情。我目前正在五倍紅寶石實習,然後這個“軌道式畫廊”是在上 JavaScript 課程得到的一個靈感,Kuro 老師教我們如何創作出簡易的畫廊,讓我也想要自己打造一個循環式畫廊的結構。
The Structure of Orbital Motion Image Gallery Before we introduced the details of this orbital motion image gallery, if you are interested, you can checkout my code here.
在進入講解軌道式畫廊的細節之前,如果你對於程式碼有興趣的話可以看這邊~❤
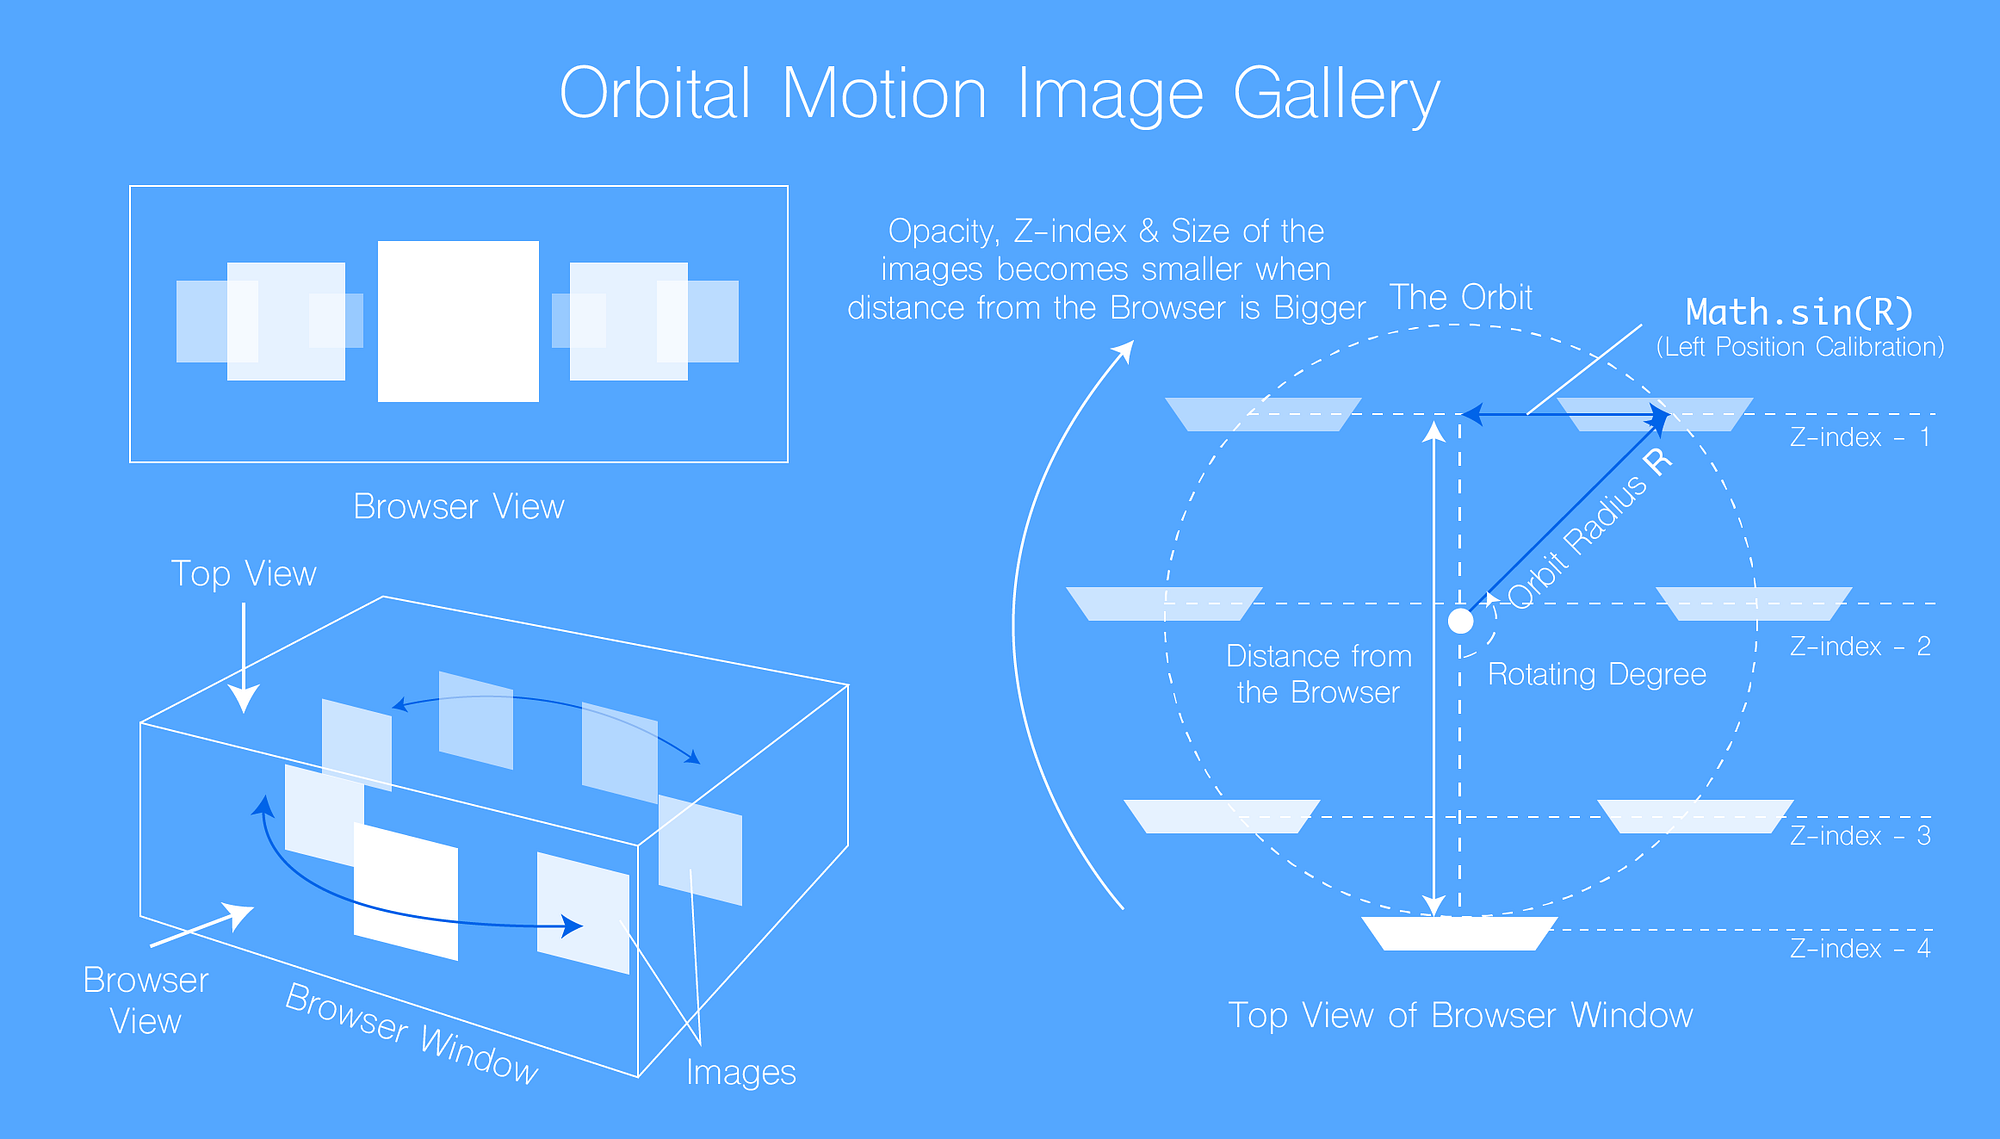
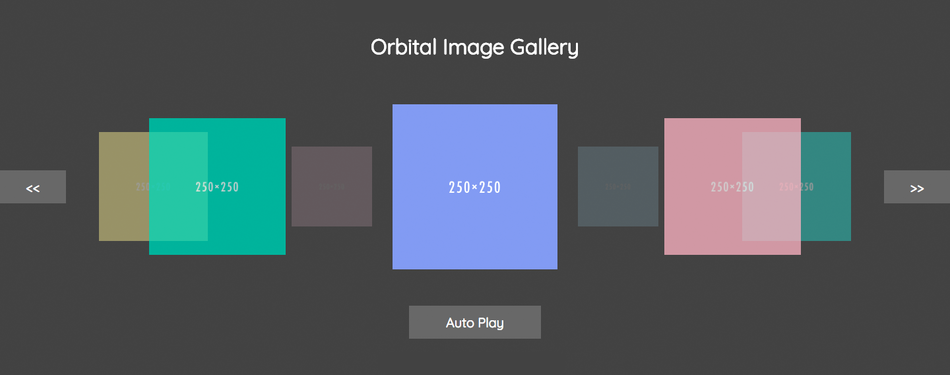
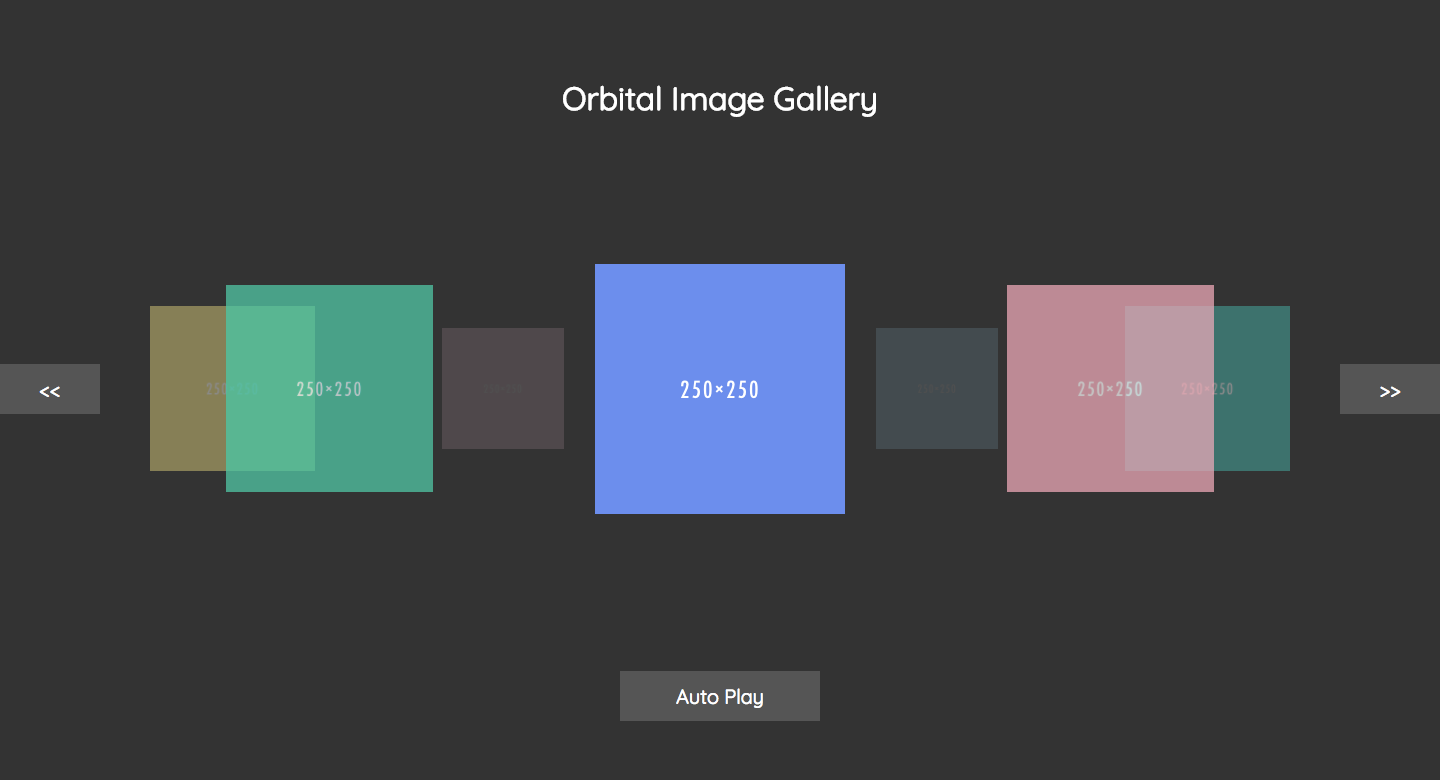
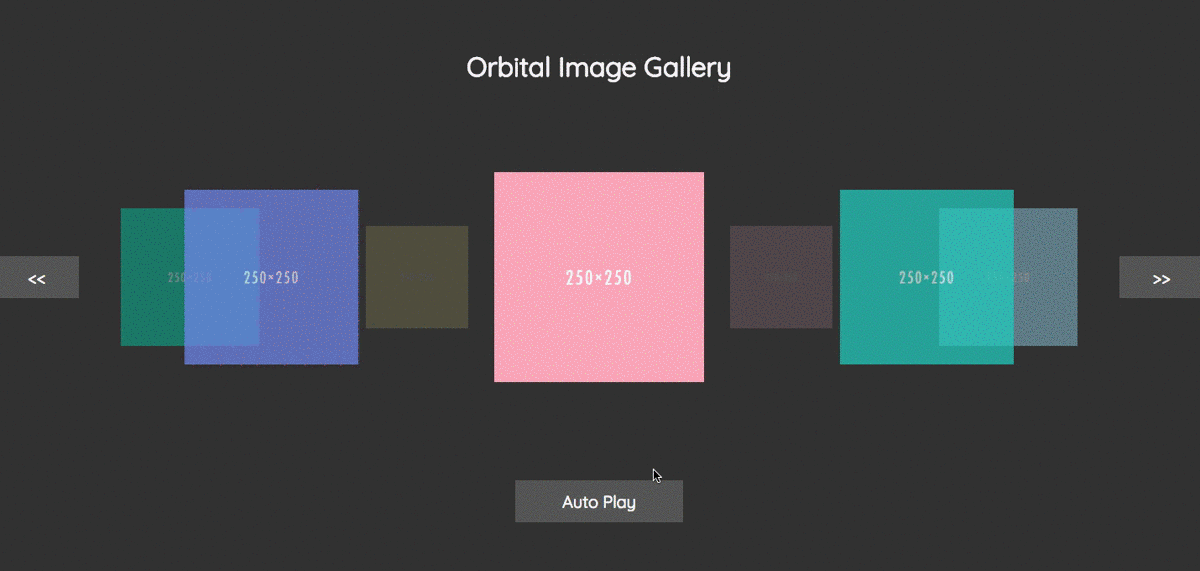
Below I will introduce the base structure and the overall view of the orbital image gallery. In order to create three dimensional alike space in two dimensional browser view, there are several key characters exhibited from the gallery image :
- The rotation degree from the front image can let us calculate the
leftposition offset (byMath.sin(radius)function) - Changing the opacity and the size of the image can create depth of the browser view (which is the z-axis)
- Assigning different levels of layer (determined by CSS
z-indexproperty) in each image can prevent the back image overlaps the front image
以下我將介紹基本的結構以及大致上軌道式畫廊會如何呈現出來。基本上我們如果要創造類似三維立體的空間呈現在二維平面的瀏覽器畫面上,畫廊裡的圖片會展現出一些特徵:
- 相對於最前面的圖片之旋轉的角度可以決定我們要從中心偏移左方距離的值(利用
Math.sin(徑度)函式可以換算) - 不同的透明度以及圖片大小可以創造出三維立體的深度(也就是 Z 軸)
- 讓每一張圖片有不同的層級(利用 CSS
z-index屬性)避免後方的圖片蓋過前方
HTML Template
<html lang="en">
<head>
  <title>Orbital Image Gallery by Maxwell Alexius</title>
  <link href="https://fonts.googleapis.com/css?family=Quicksand" rel="stylesheet">

  <!-- Inclide jQuery and jQuery Easing Plugin -->
  <script src="https://cdnjs.cloudflare.com/ajax/libs/jquery/3.2.1/jquery.min.js"></script>
  <script src="https://cdnjs.cloudflare.com/ajax/libs/jquery-easing/1.4.1/jquery.easing.min.js"></script>

  <!-- Include custom CSS and JS file -->
  <script src="./main.js"></script>
  <link rel="stylesheet" href="./main.css">
</head>
<body>
  <div id="img-wrapper">
    <button id="left-button" class="disabled"><<</button>
    <button id="right-button" class="disabled">>></button>
    <h1 id="title">Orbital Image Gallery</h1>
    <img class="gallery-img" id="img-1" src="http://placehold.it/250/4ebdae/ffffff" alt="Image" />
    <img class="gallery-img" id="img-2" src="http://placehold.it/250/96d0f1/ffffff" alt="Image" />
    <img class="gallery-img" id="img-3" src="http://placehold.it/250/f8bdd8/ffffff" alt="Image" />
    <img class="gallery-img" id="img-4" src="http://placehold.it/250/f3e274/ffffff" alt="Image" />
    <img class="gallery-img" id="img-5" src="http://placehold.it/250/0fc59b/ffffff" alt="Image" />
    <img class="gallery-img" id="img-6" src="http://placehold.it/250/5977e8/ffffff" alt="Image" />
    <img class="gallery-img" id="img-7" src="http://placehold.it/250/f19cae/ffffff" alt="Image" />
    <button id="auto-play-trigger">Stop Auto Play</button>
  </div>
</body>
</html>
Orbital Image Gallery HTML TemplateIn the HTML example file presented above, we will orbit those images with IDs starting from img-1 to img-7. Actually, my JavaScript code allows you to append or cut down the amount of images as long as you assign the ID in an ascending sequence.
在上面的 HTML 範例檔,我們將循環播放出 ID 從 img-1 到 img-7 的圖片。實際上,如果你測試我的 JavaScript 檔案,你可以任意新增或刪減圖片的數目,只要你將每一個圖片 ID 按照遞增的編號指派進去。
There are three buttons with different IDs : the #left-button, #right-button and the #auto-play-trigger button. The first two buttons animated the orbital image gallery clockwise or counterclockwise. The last button triggers whether to rotate the image gallery automatically. When in auto play mode, the left and right button should be disabled according to my design. (you can also choose to skip this feature and it doesn’t matter a lot) To further achieve that, you can use the if...else... conditional statement with jQuery $(element).addClass('disabled') or $(element).removeClass('disabled') when the button clicked.
有三個不同 ID 的按鈕分別是 left-button, right-button 以及 auto-play-trigger 。前兩個按鈕負責順時針或逆時針旋轉畫廊。最後一個按鈕可以觸發(以及取消)自動播放模式。根據我所設計的畫廊按鈕特性,當處於自動模式狀態時,前兩個按鈕會自動被禁用 disabled。(你也可以選擇跳過這一個功能,因為整體影響不大) 要達成這個功能其實只要當觸發開關被按的時候,使用 if...else... 判斷式搭配 jQuery $(元素).addClass('disabled') 或 $(元素).removeClass('disabled') 即可完成。
CSS Stylesheet
html, body {
  margin: 0; /* Reset CSS Margin */
  background-color: #333;
}
#img-wrapper {
  box-sizing: border-box;
  /* Using position "relative" in order to enable inner element use position "absolute" */
  position: relative;
  /* Full browser height and browser width */
  height: 100vh;
  width: 100vw;
}
#title { /* Omitted ... */ }
button {
  /* Some properties being omitted... */
  position: absolute; /* Using Position Absolute */
  margin: auto;
}
button:hover { /* Omitted ... */ }
#right-button {
  width: 100px;
  right: 0;
  top: 0;
  bottom: 0;
}
#left-button {
  width: 100px;
  left: 0;
  top: 0;
  bottom: 0;
}
#right-button.disabled, #left-button.disabled {
  /* Some properties being omitted ... */
  /* Using "pointer-events" property with assigned value "none" to disable the button */
  pointer-events: none;
}
#auto-play-trigger {
  width: 200px;
  left: 0;
  right: 0;
  bottom: 10vh;
}
.gallery-img {
  width: 250px;
  height: 250px;
  /* Horizontally & Vertically centering the images */
  position: absolute;
  top: 0;
  bottom: 0;
  left: 0;
  right: 0;
  margin: auto;
}
Orbital Motion Image Gallery CSS Stylesheet OverviewTo see the full CSS stylesheet, click here. There are some key points need to address here :
- The outer element with
#img-wrapperID wraps the whole orbital image gallery which uses theposition: relativeproperty in order to let the wrapped elements able to useposition: absoluteto determine child elements’ position. (If you are confused with how to use CSSpositionproperty, better check out the MDN) - In order to disable the button event, you can use the
pointer-eventsproperty assigning with valuenonewhich is very very useful instead of using JavaScript to disable the button in a hard way - Every orbited images are assigned with
.gallery-imgclass which vertically and horizontally centered in the middle of the browser. After that, we can use JavaScript to control and animate theleftoffset of the images via the rotation degree withMath.sin(rad) function which is illustrated from the structure of the orbital motion image gallery
想要看完整的 CSS 樣式,你可以按這邊。這裡有幾個關鍵的點需要提出來:
- 最外層擁有
#img-wrapperID 的元素需要用到position: relative目的是為了使內部的子元素可以使用position: absolute做到絕對定位的功能。(如果你對於 CSSposition屬性還是一知半解的狀態的話,參閱一下 MDN 吧~) - 如果要做到暫時取消按鈕的事件,你可以使用
pointer-events屬性與none值來達成。這個技巧我覺得還蠻好使用的,可以不需要使用艱澀的 JavaScript 來取消按鈕事件 - 每一個軌道式圖片都擁有
.gallery-img類別,該類別會使得所有的圖片會水平與垂直地置中在整個瀏覽器中央。之後,我們可以使用 JavaScript 藉由旋轉角度以及Math.sin(徑度)算出圖片之偏移距離(使用left屬性來偏移)控制並產出動畫。
JavaScript & jQuery
I wrapped the whole JS logic in fundamental DOM ready event in jQuery.(See JS source code here)
我把整個 JS 控制流程包到了 jQuery DOM Ready 事件裡面。(點這裡看 JS 完整程式碼)
$(document).ready(function() {
  /* JS Logic Here ~ */
});
I divided the whole program into several process. The first one is to initialize the whole orbital image gallery parameter, such as the jQuery object of the image (which is $('#img-1') and others), size, opacity, z-index, rotation degree relative to the first image and then calculate the offset position of each image via the rotation degree.
主要流程我分成幾個部分。首先是初始化整體的軌道式畫廊的參數,如:圖片的 jQuery 物件 (指得是 $('#img-1') 等)、大小、不透明度、層級數以及相對於第一張圖片之旋轉角度。然後藉由旋轉角度換算出水平偏移距離。
var imgs = [];
var imgCount = $('.gallery-img').length;
var maxZIndex = Math.floor(imgCount / 2) + 1;
var degreePerImage = 360 / imgCount;
var galleryRadius = 1000;
var imgSize = 250;
var minImgSize = 100;

function degToRad(degree) { return degree / 180 * Math.PI; }

/* Initializing the image gallery parameters */
for (var i = 1; i <= imgCount; i++) {
  var imgObj = {
    element: $('#img-' + i),
    angle: degreePerImage * (i - 1),
    zIndex: (maxZIndex - i + 1 > 0) ? (maxZIndex - i + 1) : (i - maxZIndex)
  };

  imgObj.opacity = Math.abs(imgObj.angle - 180) / 180;
  imgObj.size = (imgSize - minImgSize) * Math.abs(imgObj.angle - 180) / 180 + minImgSize;
  imgObj.left = parseInt(imgObj.element.css('left')) + galleryRadius * Math.sin(degToRad(imgObj.angle));

  imgs.push(imgObj);
}

/*
  imgs becomes an array of objects which stores the image data as a JSON format:
  {
    element: images' jquery object such as $('#img-1') to $('#img-7'),
    angle:   rotation degree relative to the first image,
    zIndex:  the level of the layer relative to the front image,
    opacity: opacity of the image,
    size:    size of the image,
    left:    image left offset distance from the center of the browser
  }
*/
The JS code above shows some key points :
- Defines variables which determines the count of the images, the maximum z-index layers, the average rotating degree between images, the radius of the gallery and the maximum and the minimum size of the images
- Uses
Math.floor(imgCount / 2) + 1to determine the maximum of the z-index layer. For instance, 7 images have at most 4 layers, 10 images have at most 6 layers. (The front image stands for a layer, the back image stands for the last layer and the others are paired in rest of the layers) - The
imgObjin theforloop stores the image’s detail parameters which can also let us calculate the opacity and other characters. - The
imgsstores array of JSON format parameters which describes the image size, position, opacity … etc
上列的 JS 程式碼有幾個部分可以檢視:
- 定義出基本的變數存取圖片的數量、最大層級數目、平均圖片間隔角度、軌道式畫廊旋轉半徑以及圖片之最大和最小的顯示大小
- 使用
Math.floor(imgCount / 2) + 1來決定最大層級數,如:七張圖片最大層級數為 4,10張圖片則是 6(顯示圖片最前面以及最後面各佔據一層,其餘則是成對佔據一層) for迴圈裡的imgObj主要記錄著各個圖片的參數諸如不透明度與其他特性等imgs存取一系列的 JSON 格式的imgObj
Examine the imgObj in the for loop :
- The
elementproperty stores the jQuery object of each image - The
angleproperty determines the angle of the image, start from the first image’s angle which represents zero degree - The
zIndexproperty determines the layer where image should be placed, for instance, the order of thezIndexproperty of 7 images will be[4(front image with the highest layer), 3, 2, 1, 1, 2, 3]; 10 images zIndex order will be assigned as[6, 5, 4, 3, 2, 1(back image), 2, 3, 4, 5].
檢視 for 迴圈裡的 imgObj :
element特性存取的純粹只是每個圖片的 jQuery 物件angle特性則是每個圖片的角度位置,第一張圖片起始度數為零度zIndex特性為每個圖片各自所在的層級數。例如,七張圖片依序層級數為[4(第一張圖片為最高層級), 3, 2, 1, 2, 3];而十張圖片則是[6, 5, 4, 3, 2, 1(最底層的圖片佔據一層), 2, 3, 4, 5]
The following properties can be calculated via the angle of the image :
- When the angle is closer to
180degrees (which is the opposite of0degree), the opacity becomes smaller - Similar to calculate the opacity of the image, when the degree is closer to
180degrees, the size becomes smaller. The variation can be determined by theimgSizeand theminImgSizeparameter. - The hardest part is using the
Math.sin(radian)function to convert the degree of the image into the distance of the left offset from the center. It is very important to know the unit conversion between degree and radian :1radian is equal todegree / 180 * Math.PI.
以下的特性可以藉由圖片所在的角度換算出來: - 當角度越靠近 180 度(也就是零度的相反)則不透明度 opacity 變低 - 當角度越靠近 180 度,則圖片變小,可以藉由 imgSize 和 minImgSize 來控制圖片變化大小 - 最難的部分在於使用 Math.sin(徑度) 函式轉換圖片之角度並計算水平偏移的距離,要注意的是:1 徑等於 degree(角度) * 180 / Math.PI
for (var j = 0; j < imgCount; j++) {
  var imgElement = imgs[j].element;
  imgElement.css({
    'left': imgs[j].left,
    'z-index': imgs[j].zIndex,
    'opacity': imgs[j].opacity,
    'width': imgs[j].size,
    'height': imgs[j].size
  });
}
The second part is very simple, initialize the whole image view with another for loop. Because we’ve already stored the jQuery object into each imgObj in imgs array, so we can just call the jQuery object via imgs[index].element with jQuery css(styles) method and assign style key-value pairs.
第二部分非常簡單,使用另一個 for 迴圈初始化整個軌道式畫廊的畫面。因為我們在之前早就存取了 jQuery 物件在 imgs 陣列裡的 imgObj,所以可以直接藉由 imgs[索引].element 搭配 jQuery css(樣式) 方法指派樣式的鍵值對。
/* Setting Up Events */
$('button').on('click', function(event) {
  event.preventDefault();
  if (animating) { return; } else animating = true;

  if (this.id === 'right-button') {
    var mem = imgs[0].element;
    for (var i = 1; i < imgCount; i++) {
      imgs[i - 1].element = imgs[i].element;
    }
    imgs[imgCount - 1].element = mem;
  } else if (this.id === 'left-button') {
    /* Omitted... */
  }

  /* Animate and assign next state */
  for (var j = 1; j <= imgCount; j++) {
    imgElement = imgs[j - 1].element;
    imgElement.animate({
      left: imgs[j - 1].left,
      opacity: imgs[j - 1].opacity,
      width: imgs[j - 1].size,
      height: imgs[j - 1].size,
    }, 500, 'easeOutQuart', function() {
      if (animating) animating = false;
    });
  }
});
The third part is to set up the button onclick event which controls the left-button and the right-button event. In this sample code, I omitted left-button part because it just the converse action against the right-button‘s control flow.
第三部份是設定出 onclick (按鍵事件),使得 left-button 以及 right-button 可以控制畫廊的旋轉動態特效。在以上的範例程式碼我省去了 left-button 的邏輯,因為它的邏輯就跟 right-button 相反,可以留給讀者自己試試看。
Actually, the first if...else... statement logic is simple. We have already calculated and set up the left offset distance, the opacity , the size and blah blah blah… which means the only thing we need to do is to change the order of jQuery objects in each image parameter object and animate it. For instance, assume we have the array of image parameter object listed below.
實際上,第一個 if...else... 的邏輯很簡單。我們早就已經計算並訂立好 left 偏移距離、不透明度、大小等等,代表我們可以純粹只是交換 jQuery 物件在的 imgs 陣列裡的位置然後再產生動畫。舉例來說,假設我們有一系列的圖片參數在 imgs 陣列如下。
imgs = [
  {
    element: $('#img-1'),
    opacity: 1,
    ...
  },
  {
    element: $('#img-2'),
    opacity: any value between 0 ~ 1,
    ...
  },
  ...
  {
    element: $('#img-6'),
    opacity: any value between 0 ~ 1,
    ...
  },
  {
    element: $('#img-7'),
    opacity: any value between 0 ~ 1,
    ...
  }
]
After clicking the right-button, we just change the element property order of the imgs into the below format.
當按下了 right-button ,我們僅僅調換了 imgs 裡的 element 特性的順序位置而形成下面的格式。
imgs =
[
  {
    element: $('#img-2'), // $('#img-1') => $('#img-2')
    opacity: 1,
    ...
  },
  {
    element: $('#img-3'), // $('#img-2') => $('#img-3')
    opacity: any value between 0 ~ 1,
    ...
  },
  ...
  {
    element: $('#img-7'), // $('#img-6') => $('#img-7')
    opacity: any value between 0 ~ 1,
    ...
  },
  {
    element: $('#img-1'), // $('#img-7') => $('#img-1')
    opacity: any value between 0 ~ 1,
    ...
  }
]
This is what the loop in the if...else... statement doing. Vice-versa for the left-button part.
這就是 if...else... 運算是內部的迴圈在做的事情。對於 left-button 部分則是相反的指派順序。
The second for loop in this section, instead of using the jQuery css(styles) method, we directly use the animate() method and assign the next state of styles. With the jQuery easing plugin, you can use different types of animation which is listed in this website.
第二個 for 迴圈部分則是用 animate() 方法來產生動畫,並非使用的是 css(樣式)(因為如果使用後者反而產不出任何動態效果)。藉由 jQuery Easing 插件,你可以使用別人幫你做好的,各種不同的動態特效,詳細請參閱這邊~
Notice that animating was a global variable which is defined out of this function scope. It is a type of boolean data which prevents multiple click events during one time animation. In other words, when the gallery is animating, for instance, it will prevent user from clicking 10 times during the animation and then the gallery animate 10 times accordingly. If no prevention, then the user must wait for entire 10 times animation completed which isn’t a good practice.
另外,animating 是一個全域變數,定義在事件函式的外面。該變數為一種布林資料,目的是防止同一次動畫裡觸發到多個動畫事件。也就是說,當畫廊正在動作時,舉例來講,會防止使用者同一時間在多次觸發 10 次按鍵事件,避免之後會多出 10 次動畫。如果沒有這項措施,會造成使用者會連續等待 10 次動畫完成才能觸發其他事件,這並不是很好的實踐。
function autoPlay() {
  autoPlayID = setTimeout(function() {
    $('#right-button').click(); // Simulating the right button onclick event
    if (autoPlaying) { autoPlay(); }
  }, 2000);
}

$('#auto-play-trigger').on('click', function(event) {
  event.preventDefault();
  autoPlaying = !autoPlaying;
  if (autoPlaying) {
    $(this).text('Stop Auto Play');
    $('#left-button').addClass('disabled');
    $('#right-button').addClass('disabled');
    autoPlay();
  } else {
    window.clearTimeout(autoPlayID);
    $(this).text('Auto Play');
    $('#left-button').removeClass('disabled');
    $('#right-button').removeClass('disabled');
  }
});
autoPlay();
Finally, the last part is the #auto-play-trigger onclick event which enabled or disabled the autoPlay mode. Notice that the autoPlaying and autoPlayID are the variables also defined outside the function scope.
最後,開始設定切換自動模式(autoPlay 模式)的按鍵事件在 #auto-play-trigger 按鈕上。要注意的是,上面的範例程式碼中的 autoPlaying 以及 autoPlayID 已在函式以外的區域被定義好。
The function autoPlay() will keep set up the window timeout event by calling itself as long as it is in autoPlay mode. In this example, if the gallery is in autoPlay mode (which autoPlaying is true), it will keep animate in every 2 seconds. The $('#right-button').click() simulate the action which triggers the #right-button onclick event.
只要維持在 autoPlay 模式裡 (autoPlaying 的值為 true),autoPlay() 函式會不斷地自己設立 timeout 事件,根據上面的範例程式碼,畫廊每兩秒會動作一次。而 $('#right-button').click() 則是在模擬使用者按 #right-button 的行為。
The lower part is to set up the #auto-play-trigger event which can switch the autoPlay mode state between true and false. The if...else... statement inside uses the jQuery addClass() and removeClass() to determine whether to disable the buttons or not. When switched to autoPlay mode, it calls the autoPlay function again. Conversely, it stops the autoPlay timeout event via the window.clearTimeout(TimeoutID) method.
下方的部分則是設立 #auto-play-trigger 之按鍵事件,可以任意切換自動模式。裡面的 if...else... 判斷式使用了 jQuery 的 addClass() 以及 removeClass() 方法來切換按鈕的禁用模式。當觸發到自動模式則會呼叫 autoPlay() 函式;相反地,使用 window.clearTimeout(timeoutID) 方法可以取消掉 autoPlay 模式裡不間斷的 setTimeout() 事件。
Finally, we’ve completed the orbital motion image gallery!
最後,我們終於完成了整個軌道式畫廊!
Last But Not Least …
Everything you saw in this article, aside from HTML and CSS part, from learning the basic concept of JavaScript to using jQuery creating simple interesting animation, sending AJAX request(which is not told in this article), teacher Kuro explained every details comprehensively. This article combines multiple JavaScript concepts which covered about one third of the course lesson.
這篇文章所使用到的技巧,除了 HTML 以及 CSS 的部分以外,從學習基本的 JavaScript 觀念到使用 jQuery 創作出簡單有趣的動畫,送 AJAX 請求(但這一個部分並沒有在這篇文章提到),這些主題 Kuro 老師都講解得很完整。這篇文章大致上運用了涵蓋了三分之一的課程內容。
The most impressive part of the lesson is talking about JavaScript functions. In my perspective, JavaScript function is the toughest part of the whole lesson. Function defining, invoking and hoisting and moreover, the concept of callback functions, closures, anonymous function and function scope, these are the topics which caused a lot of headache during learning JavaScript by myself. After this course, I finally solved those problems and greatly advanced my JavaScript skills.
而最精彩的部分就是在講解 JavaScript Functions。在我眼裡,這個主題是我在自學過程中最複雜而且踩雷最深的部分。從函式的定義、呼叫、變數提升還有像是回呼、閉包、匿名函式,以及函式的區域變數等,Kuro 老師藉由一系列的範例使得這些觀念更容易被傳達。這一個課程解決了我許多的困惑,也提升了不少技術方面的概念。
Learning JavaScript is fun. Create my own project with JavaScript is very fulfilling and satisfying to me. The JS course in 5xRuby boost up my JavaScript skills.
學習 JavaScript 的過程很好玩。自己打造出 JavaScript 應用程式使我非常有成就感與滿足感。而五倍紅寶石的 JavaScript 課程大幅地將我的能力提升到另一種境界。
此分享轉載自五倍 Rails 實習生 Maxwell 的 Medium 部落格