React 大補帖

React 大補帖
主要介紹一些學 React 後期會用到的技巧,不會寫得太多太深入,寫太多大概看一半就關掉跳出去了,給還不知道的人有一點觀念,網路上資源豐富,有觀念之後要實作就不是難事了。
目錄
- setState
- event binding
- JSX & createElement
- Pure Component
- componentDidCatch
- React.Fragment
- React.Children
- ReactDOM.createPortal
- Hight Order Componet(HOC)
- Render Props
以下會使用 ES6 + React JSX 來表達程式碼。
1. setState
語法:setState(updater[, callback]), 務必記得 setState 是非同步事件,所以要好好善用第二個 callback 參數,才能得到正確的結果。
  錯誤用法
  onClick(){
    this.setState({ count: this.state.count + 1 })

    // 有可能會在 setState life cycle 還沒跑完之前執行
    console.log(this.state)
  }

  正確用法
  onClick(){
    this.setState({
      count: this.state.count +
   }, () => (console.log(this.state)))
  }
- 第一個參數可以使用 updater function,特別是有頻繁的 setState 動作且又會參照到先前的 state,例如 累加。
updater function:(prevState, props) => stateChange
不太好的做法
有可能會在 react 還沒更新完 state 的時候用當下的 state 做計算,要記得 setState 是非同步事件
onClick(){
  this.setState({
    counter: this.state.counter + 1
  })
}
正確做法
使用 updater function 給的 preState 參數做非同步處理
onClick(){
  this.setState(
    (prevState, props) => (
      { counter: prevState.counter + 1 }
    )
  )
}
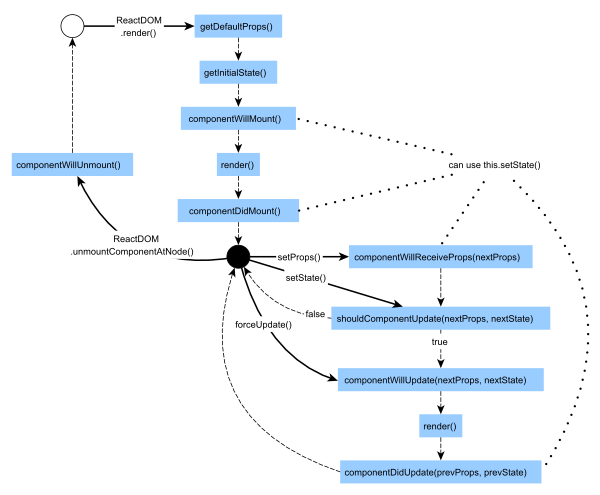
寫 React 一定要知道的 life cycle
2. event binding
最常見的使用時機在於添加 event listener 的時候,會需要將當下的 this 重新綁定,以下列出最常見的實作方式。
- ### at jsx
  <Button
    onClick={ // 通常行數很少的情況才會直接寫在 jsx
      (e) => {
        e.preventDefault()
        this.setState({ ... })
      }
    }
  >
   Click Me
  </Button>
hight order function
class Foo extends React.Component {

  onClick(arguments) {
    // es6 arrow function 會自動綁定當下的 this
    return (e) => {
      const { arg1, arg2 } = arguments
      // 可以做到傳參數近來並回傳不同行為的 function
      e.preventDefault()
      this.setState({ ... })
    }
  }

  render() {
    return (
      <button
        onClick={
          // 注意必須執行才能拿到裡面 return 回來的 function
          this.onClick(arguments)
        }
      >
        Click Me
      </button>
    )
  }

}
bind at constructor
class Foo extends React.Component {
  constructor(props){
    super(props)
    this.state = { ... }

    this.onClick = this.onClick.bind(this) // bind at constructor
  }

  onClick(e) {
    e.preventDefault()
    this.setState({ ... })
  }

  render() {
    return (
      <button onClick={this.onClick}>Click Me</button>
    )
  }

}
class properties
需要安裝 babel-plugin-transform-class-properties https://babeljs.io/docs/plugins/transform-class-properties/
class Foo extends React.Component {

  onClick = (e) => {
    e.preventDefault()
    this.setState({ ... })
  }

  render() {
    return (
      <button onClick={this.onClick}>Click Me</button>
    )
  }
}
3. JSX & createElement
- JSX 是 React 的語法糖(syntactic sugar)所以 JSX 可以做到的,React 也都可以做到。
- 語法糖方便,但也要知道背後轉換的結果, 你才知道你在做什麼,例如 ruby 中的
foo = foo + 1 等同於 foo = foo.+(1)。
function hello() {
  return <div title="hello">Hello world!</div>
}

等同於

function hello() {
  return React.createElement(
    "div",
    { title: "hello" },
    "Hello world!"
  )
}
這時就會有疑問,既然 JSX 那麼方便,那什麼時候才會需要用到 createElement ?
答案就是 JSX 做不到的時候,例如你的資料是一大包序列化的 object,每一筆資料要 render 的 tag name 不是可預期的時候,也就是把 tag name 序列化到 object 儲存的時候。
4. Pure Component
React.PureComponent 跟 React.Component 的最差別在於,Pure Component 不會實作 shouldComponentUpdate 來重新 render Component,是用名叫 “shallow prop and state comparison” 的方式檢查。(原始碼)
const MyComponent = ({ text }) => (
  <div>{ text }</div>
)
等同於
class MyComponent extends React.PureComponent {
  render() { ... }
}
並不是所有 Component 都用 Pure Component 效能就是最好,如果你的 props & state 會很頻繁的改變,那麼 shallowEqual 就會執行並深入檢查需不需要 rerender 進而浪費時間在檢查上,如果你一開始就知道 props & state 會頻繁更動,那麼就應該使用正常的 Component 直接做 shouldComponentUpdate 並每次狀態改變就重新 render。
5. componentDidCatch
- React16 新加入的功能,能讓你 catch render 後發生的 exception,可以搭配做成 HOC 或是 Class 來使用,是一個非常方便的功能,至少不會讓你的 app 整個壞掉空白,還能夠 trace 錯誤發生的 component stack。
componentDidCatch(error, info) {
  // Display fallback UI
  this.setState({ hasError: true })

  // You can also log the error to an error reporting service
  logErrorToMyService(error, info);
}
詳細參考 https://reactjs.org/blog/2017/07/26/error-handling-in-react-16.html
6. React Fragment
- 有時候你會只想要 render 多個 list,但又不想包一層 div 在外面。
render() {
  return [
    <li key="A">First item</li>,
    <li key="B">Second item</li>,
    <li key="C">Third item</li>,
  ]
}
for static children
render() {
  return (
    <React.Fragment>
      <li>First item</li>
      <li>Second item</li>
      <li>Third item</li>
    </React.Fragment>
  )
}
詳細用法可以參考 https://reactjs.org/docs/react-component.html#fragments https://reactjs.org/docs/fragments.html
7. React.Children
- 善用 children 可以幫助把重複的 component 元件抽出來使用。
<Draggable>
  <MyComponent />
</Draggable>
等同於
<Draggable children={<MyComponent />} />
children 也可以是陣列
<Draggable children={
    [
      <h1>Hello!</h1>,
      <p>World</p>,
      <MyComponent />
    ]
  }
/>
8. ReactDOM.createPortal
React 提供一個可以把 Component render 在特定 dom 上面的方法,很常用在 tooltips、popup modal 跟 z-index 或者是 overflow 相關的實作上。
ReactDOM.createPortal(child, container)
舉一個例子,當你有一個 navigation 和 container 上下兩個區塊,通常我們會這樣切版。
  <body>
    <!-- z-index: 2 -->
    <div id="navigation"></div>

    <!-- z-index: 1 -->
    <div id="container">
      <button>trigger render react modal at here</button>
      <div class="modal" ></div>
    </div>
  </body>
因為最外層 navigation 和 container 已經設有 z-index,且 navigation > container,所以無論 container 裡面的元件 z-index 如何,都無法蓋到 navigation 上面,這時候使用 ReactDOM.createPortal 來 render component 到最外面是很方便的方法。
9. Hight Order Component (HOC)
- HOC 是 react 中重用 Component 邏輯的技術,其實就是高階函式(HOF),只是它接收一個 Component,並返回一個 Component。
以官方最簡單的示範為例:
function logProps(InputComponent) {
  InputComponent.prototype.componentWillReceiveProps = function(nextProps) {
    console.log('Current props: ', this.props);
    console.log('Next props: ', nextProps);
  };
  // The fact that we're returning the original input is a hint that it has
  // been mutated.
  return InputComponent;
}

// EnhancedComponent will log whenever props are received
const EnhancedComponent = logProps(InputComponent);
可以看到 HOC 可以很方便的為 Component 加上預處理的行為,參數就是一個 React Compoent, 所以你可以使用該 Component 的所有資訊 ( state、props、children… ),只要記得在最後也要 return React Component。
配合 React16 的 Error Boundary:
function MyErrorBoundary(WrappedComponent) {
  return class extends React.Component {

    constructor(props) {
      this.state = { hasError: false }
    }

    componentDidCatch(error, info) {
      this.setState({ hasError: true })
      this.logErrorToMyService(error, info)
    }

    logErrorToMyService() { ... }

    render() {
      return <WrappedComponent {...this.props} />
    }
  }
}

const MyApp = MyErrorBoundary(MyAppComponent)
10. Render Prop
Render Prop 主要用來解決 React Mixin 的問題,跟 HOC 的目的是一樣的,但是 HOC 有兩個問題存在:
Indirection:props 的來源是從 HOC 間接得來的,無法在 Component render 的時候知道 props 是誰給的,必須去看該 HOC 裡面最後 render 的 props。
Naming collisions:因為 HOC 最後會把原始 props + HOC 提供的 props,一起給 Component,所以就會有機會造成 props key naming collisions 問題。
Render Prop 定義:
The term “render prop” refers to a simple technique for sharing code between React components using a prop whose value is a function.
A component with a render prop takes a function that returns a React element and calls it instead of implementing its own render logic.
<DataProvider render={data => (
  <h1>Hello {data.target}</h1>
)}/>
先來觀察上面的範例 pattern
- 重用的邏輯 Component:
預期接收一個名子叫 “render” 的 props,不是 render 方法不要搞錯, props 名子可以自己定義。 - render props 預期接收一個 function,並且提供 data 的參數,所以 data 的來源就是
主要處理的事情。 - 拿到 data 之後就可以使用 data 來 render component。
實作看看 DataProvider
DataProvider ( Render Props 版本 )
class DataProvider extends React.Component {
  constructor(props) {
    super(props)
    this.state = { userName: undefined, userEmail: undefined }
  }

  componentDidMount() {
    const data = this.apiGetData()
    this.setState({ userName: data.userName, userEmail: data.userEmail })
  }

  apiGetData(){
    return {
      userName: 'hao',
      userEmail: 'hao123@gmail.com',
    }
  }

  render() {
    return (
      <div>
        {
          //注意這裡會呼叫 props:render 的 function,
          //並將 data 帶入得到一個寫在 props:render 裡面的 component 做 render
          this.props.render(this.state)
        }
      </div>
    )
  }
}

const App = () => (
  <div>
    <DataProvider render={data => (
        [
          <h1>Hello, {data.userName}</h1>,
          <p>{ data.userEmail }</p>
        ]
      )}
    />
  </div>
)

ReactDOM.render( <App /> , document.getElementById('app'))
DataProvider ( HOC 版本 )
function DataProvider(WrappedComponent) {
  return class extends React.Component {

    constructor(props) {
      super(props)
      this.state = { userName: undefined, userEmail: undefined }
    }

    componentDidMount() {
      const data = this.apiGetData()
      this.setState({ userName: data.userName, userEmail: data.userEmail })
    }

    apiGetData(){
      return {
        userName: 'hao',
        userEmail: 'hao321@gmail.com',
      }
    }

    render() {
      return (
        <WrappedComponent
           {
             // 原本 Component 的 props
             ...this.props
           }
           data={
           // HOC 提供的 props, 可能會有命名重複的問題
             this.state
           }
        />
      )
    }
  }
}

const MyComponent = ({ data }) => (
// 這裡只預期接收 data 的 props, 但是並不會知道 data 是從哪來得來的
  <div>
    <h1>Hello, { data.userName }</h1>
    <p>{ data.userEmail }</p>
  </div>
)

const MyComponentWithData = DataProvider(MyComponent)

const App = () => (
  <div>
    <MyComponentWithData />
  </div>
)
以上是 React 實作 Mixin 的技巧,HOC 雖然有缺點,但是如果你知道缺點在哪裡進而避開的話,HOC 其實是很方便直覺的方式,Render Prop 把 props 來源的間接性與重複性消除,在單層 mixin 的話很直覺使用。
其它重構方式還有使用 children、react class inherit 等等 … ,每種都有它的特點,沒有說一定要使用哪一種方式,依照當下情境做自己覺得最適合的判斷就可以了。
想知道 render prop 出處可以參考這篇文章:https://cdb.reacttraining.com/use-a-render-prop-50de598f11ce
參考 React Documents Advanced Guides:https://reactjs.org/docs/jsx-in-depth.html