Tamashii - Create Rails IoT applications more easily
- Event: RubyKaigi 2017
- Date: 9/20(Wed) 10:00 - 10:40
- Hall: Cosmos
- Speaker: Henry Tseng
- Github: lctseng
- Twitter: @lctseng
Abstract
With the rise of embedded devices with general purpose operating system, running arbitrary programs on IoT devices becomes more feasible. Raspberry PI is one of the examples. We can use sensors, speakers, and even cameras as building blocks to make our unique IoT devices. However, there must be some framework to integrate these components, and that is why we create the Tamashii system. Tamashii is a Ruby-based IoT framework on Raspberry PI. It defines common interfaces between components. It also provides a Rack-based device management server inspired by Action Cable and makes it easy to integrate IoT logic into Rails application. We have implemented a check-in system with Tamashii and proved to work fine on Rubyconf.tw 2016.
Tamashii Official Website: https://tamashii.io
What is Tamashii
Tamashii is a Japanese word, stands for the soul. Why we call it Tamashii is that we hope we can give a soul to the device so that we can interact with the devices easily.
In short, we can say that Tamashii is a Ruby-based framework for easy integration between IoT devices and Rails applications. It covers both client side and server side.
Currently, we implement Tamashii on the Raspberry PIs. Tamashii provides a way for you to control devices with elegant Ruby code.
For the server side, Tamashii server is Rack-based, so it is easy to integrate Tamashii into an existing Rails application.

Features
Hardware component management
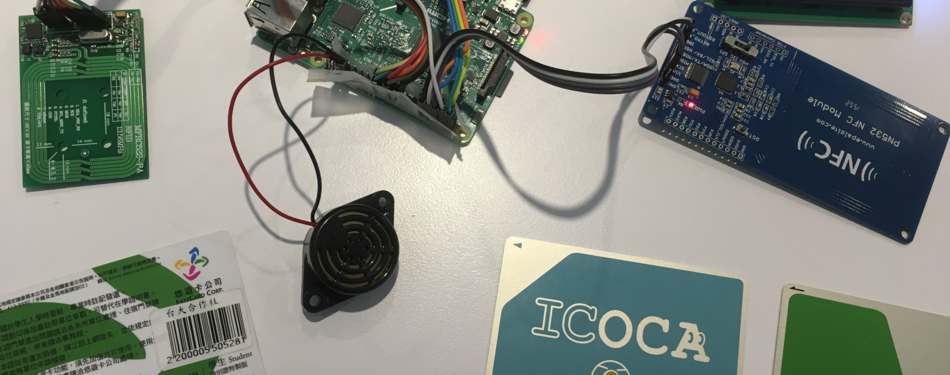
We implement and test Tamashii on Raspberry PI, so the hardware here means those extra components that can be installed on Raspberry PI. Such as RFID readers, motors, LCD displays, and buzzers.
Tamashii wraps this hardware with high-level API layer. With Tamashii, users can write high-level logic to drive the hardware, without knowing the tedious device protocol.
Although this hides some advanced device features from users, for Tamashii, providing easy interface is much more important than complex ones. This is just like Rails does.

Here is some example code to demonstrate the API of Tamashii. You can see that we make all the hardware devices into Ruby objects. You can interact with them using elegant Ruby code.
The first example is the buzzer. The buzzer is a small speaker that can play beep sounds.

buzzer = Buzzer.new
buzzer.beep(3) #=> Beep, Beep, Beep!
The second example is the LCD display. It can print simple text on its screen.

display = Lcd.new
display.print("RubyKaigi 2017!")
The last example is the RFID reader. It can read the data from RFID cards. For example, the SUICA or ICOCA in Japan.

reader = RfidReader.new
if data = reader.read
  puts "Card data: #{data}"
end
Event-based data exchange
Although we can operate these devices with high-level API, we usually don’t use them individually. Instead, we combine them together. Tamashii employed an event-based manner for data exchange between components.
Imagine you want to play a sound and show messages when your RFID reader successfully reads the data. The event-based model allows components work individually. The following figure describes the event-based behavior.

When there comes a new RFID card, the card reader will emit an event. Then the Tamashii will dispatch to other components. Finally, components process the events on their own thread and perform the corresponding action.
WebSocket Networking
It is one of the most important issues when building an IoT application. When the client device read the data from RfidReader, it needs to send data back to the server and receive further instructions.

For example, we want to read a user id from a RFID card and check with the server database, then show corresponding messages on the LCD display. Also, the server may need to send some messages to clients directly without any request from the client. This happens when the server wants to push new updates to clients or requests the client to reboot the devices.
If two-way communication is the only thing we need, a simple TCP socket is sufficient. However, we want to integrate the devices into the web application and keep the high performance. That is why we choose WebSocket to implement networking of Tamashii.
WebSocket is part of the HTML5. It allows us to establish a two-way communication between web server and client. With it, the server push notifications can be implemented with less overhead than traditional polling.
WebSocket uses the same port as HTTP, so we don’t need to worry about firewall and proxy settings. WebSocket also supports transport layer security, just like HTTPS. WebSocket is not new, actually. Many modern web servers and frameworks support WebSocket, such as Rails.
Rails Integration
Because we are using WebSocket, it is much easier to integrate Tamashii into Rails. We develop a Rack-based Tamashii server. The server uses WebSocket to communicate with clients and uses Redis to store the information about clients.
We also have device management protocol. We define some events shared by client and server. They can be classified as two major categories: the data events and command events. Data events are for sensor data sent from the client. For example, the card data read from the RFID reader. Command events are for asynchronized server-to-client commands, such as reboot and play a sound.
Tamashii server also provides model-like API for the device. It hides all low-level device management detail and only exposes the abstract device operation to users. Just like the Rails Model hides database operation from users
Imagine you want to find a device with serial number “1234” and make it play 3 sounds. You can use find_by method with the serial number to query the device from Tamashii. Then call the beep method with parameter 3.
device = Device.find_by(serial: "1234")
device.beep(3)
That’s all! The Tamashii will handle the rest of things, including query, encode, transfer, decode and process a command. The web developers don’t need to know the detailed operation of the device, just treat it as a model.

Hardware supported
Currently, Tamashii is developed and tested on Raspberry PI 3 (Raspbian Jessie). We support the following hardware:
PWM buzzer (SFM-27-W)

MFRC522 RFID reader via SPI

PN532 RFID reader via UART

LCM 1602 Display via I2C

Repositories
Tamashii is consist of many projects. The link and description of each repository follow:
tamashii The WebSocket framework implements inspired by ActionCable. This repository contains the code for server side. The client side is in tamashii-client.
tamashii-client The WebSocket client for the tamashii project. It is event-driven and it provides high-level API for users to communicate with WebSocket server easily.
tamashii-manager The package for managing IoT devices that can handle communication between IoT devices in a way similar to Rack.
tamashii-agent Tamashii Agent is the client project opposites to the server project tamashii-manager. It runs on Raspberry PI. It manages the IoT components on the device and provides high-level API to let developers control the components easily.
tamashii-common Tamashii Common is a collection of some commonly used features in Tamashii, including recording, setting, packet encapsulation, etc.
tamashii-checkin This is a Rails application based on Tamashii. The main purpose of this system is to track the flow of attendees. We have deployed this system on the RubyConfTW 2016.
tamashii-clockin This is another Rails application based on Tamashii. This system is used to record the daily check-in and check-out.
Demo Projects and More Details
We will show the demo video of Tamashii and two projects that built on it. We will also discuss more technical details and the ideas behind creating Tamashii. Hope to see you at RubyKaigi 2017!